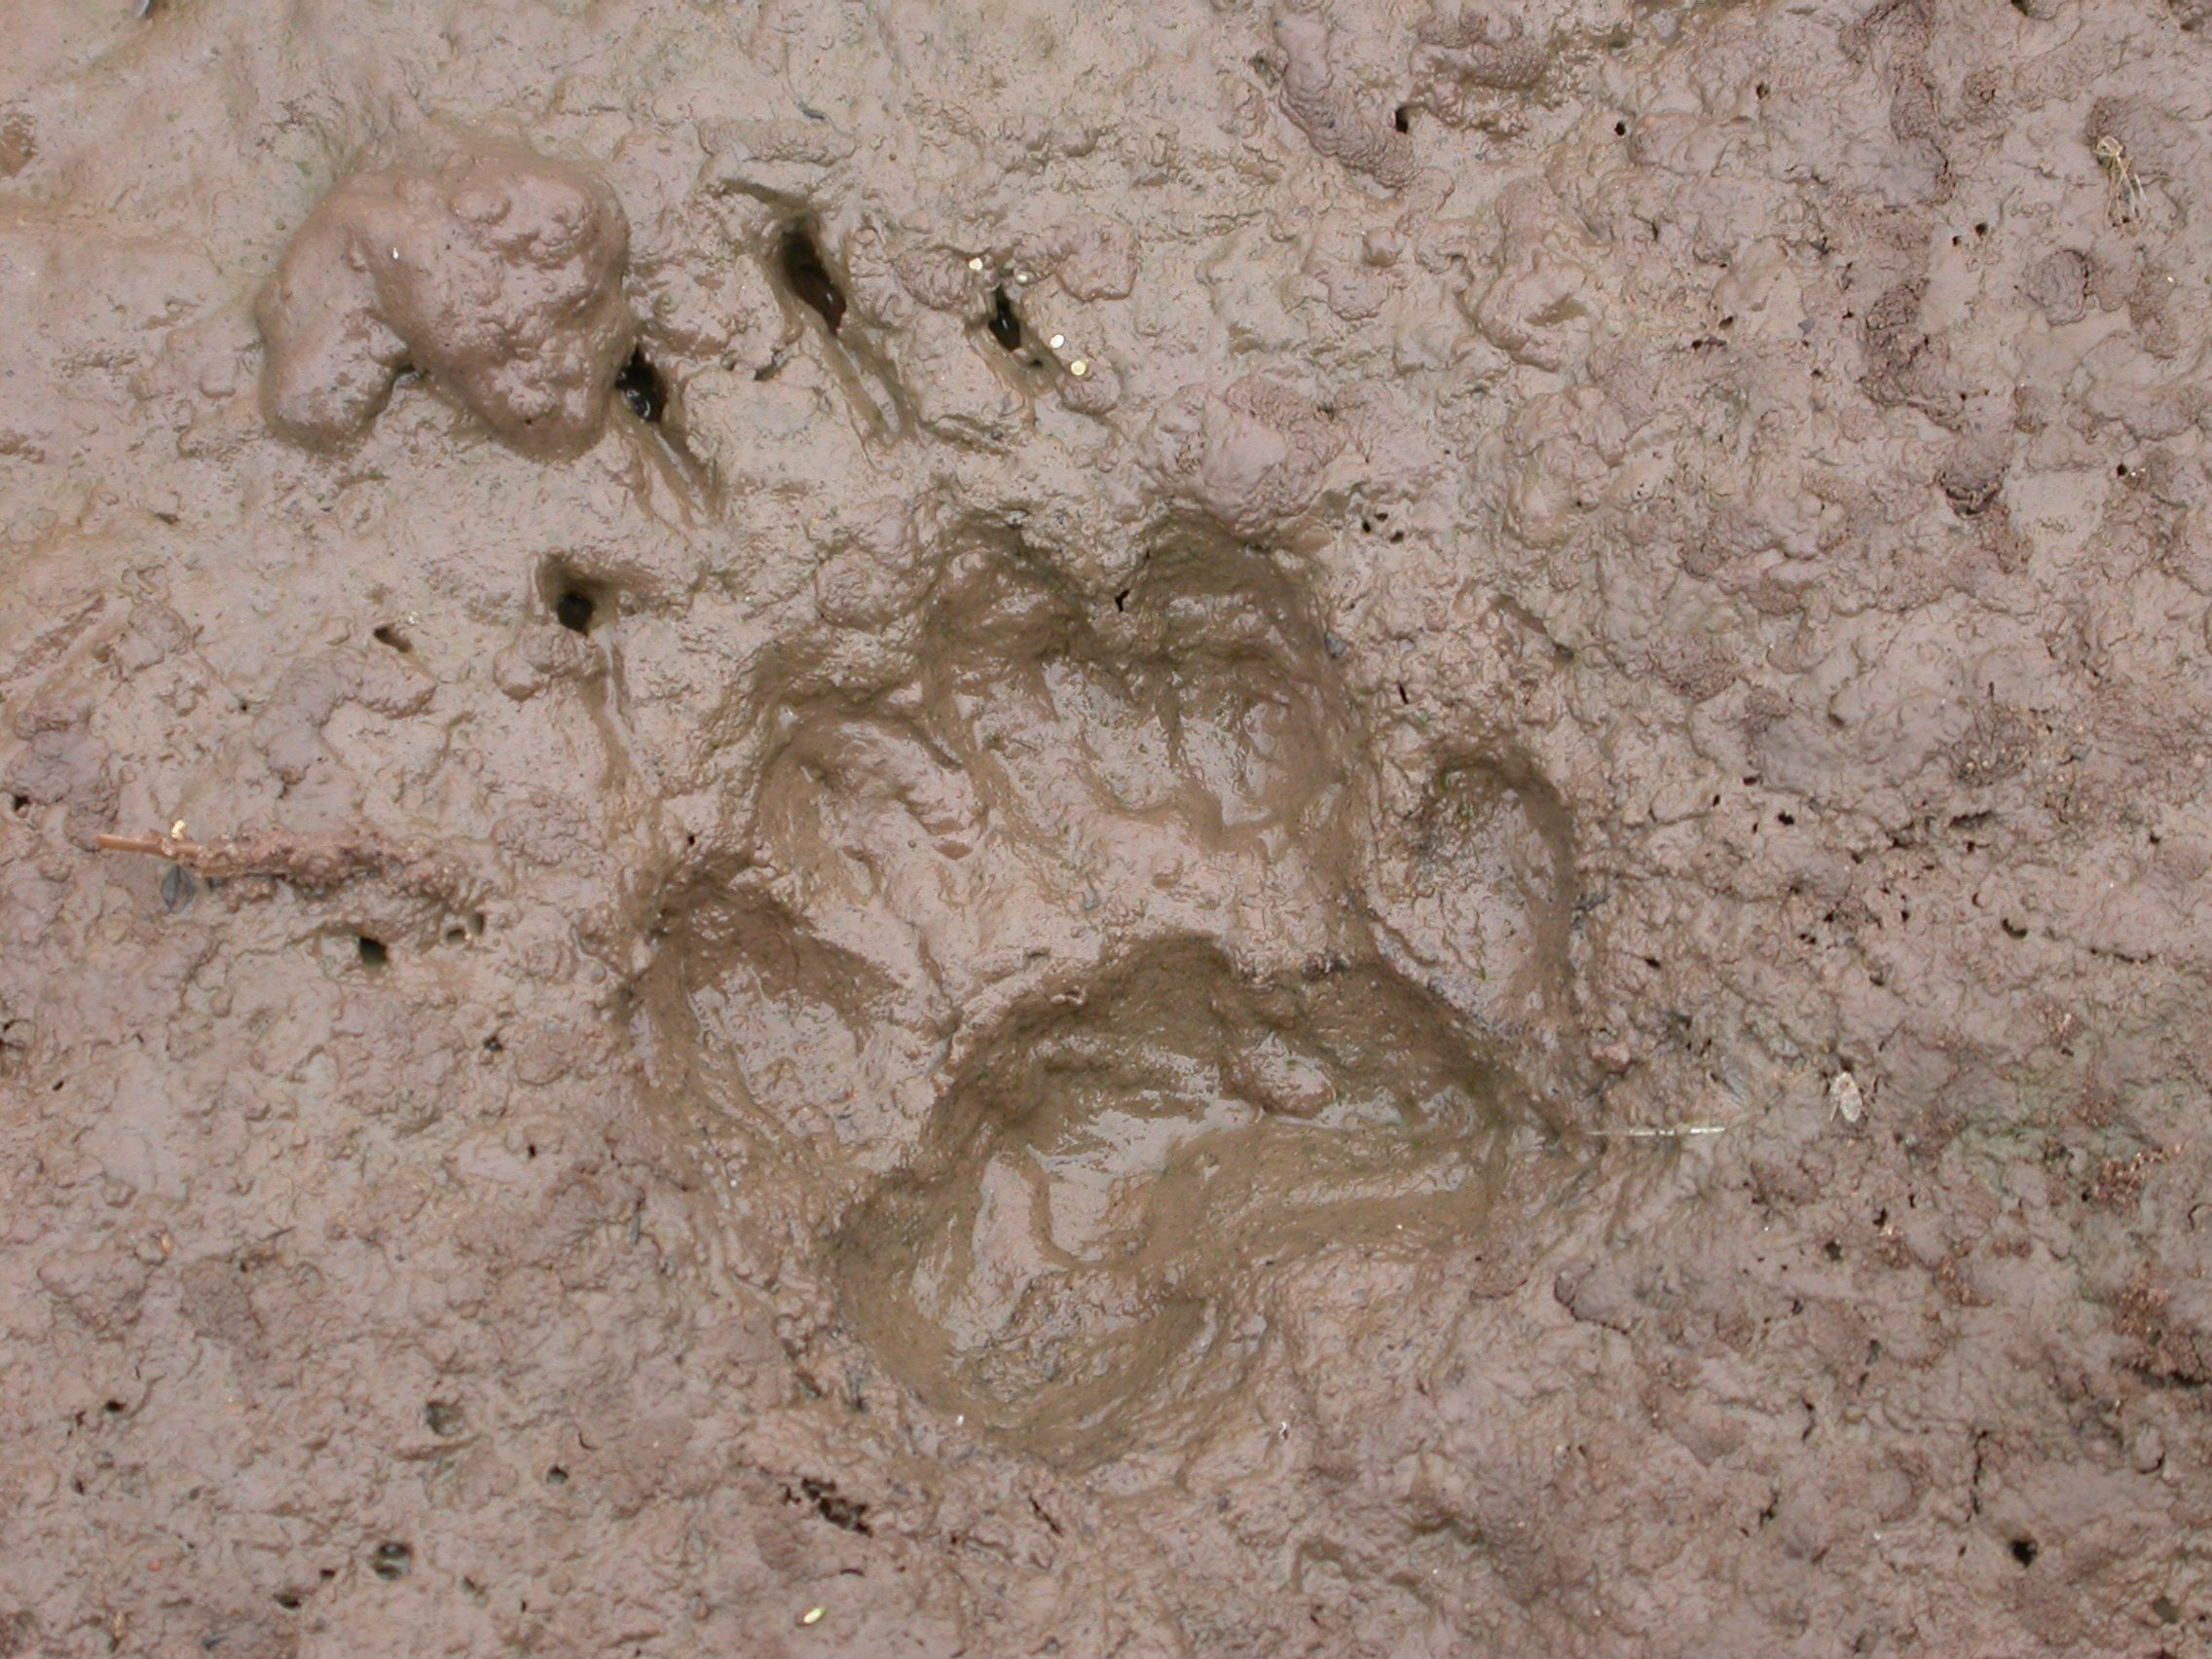
SGUK Outdoor Skills Challenge 94: Track an Animal Across Mud or Snow for 100m
Following animal tracks is one of those outdoor skills that changes how you see the landscape. A muddy path that first appears empty may contain a trail of footprints, tiny marks from claws, disturbed leaves and other clues that reveal which animals have passed through.
Your challenge is to find a genuine animal trail in mud or snow and follow it for 100 metres. You do not need to identify the animal perfectly or find a rare species. The aim is to observe carefully, make reasoned deductions and learn how tracks change as the ground and the animal’s movement change.
Your Challenge
Find a set of animal tracks in suitable mud or snow, identify the most likely animal responsible and follow the trail for a measured distance of 100 metres.
Along the way, pay attention to the size and shape of the prints, their spacing, the direction of travel and any changes in the pattern. Look for supporting evidence that helps you distinguish one animal from another.
You should aim to:
- Find a clear trail of genuine animal tracks.
- Record the features that help you identify the likely animal.
- Follow the tracks for 100 metres without losing the trail, where conditions allow.
- Notice at least three changes or details along the route.
- Finish by explaining what you think the animal was doing and how confident you are in your identification.
If you cannot find a continuous trail, you can practise on a shorter section first, but complete the full 100 metres to finish the challenge. Choose a location where tracking is permitted and avoid disturbing wildlife.
What You’ll Need
You can complete this challenge with very little equipment, although a few items will help you record what you discover.
- Suitable ground: Mud, soft earth or fresh snow that holds clear impressions.
- Notebook and pencil: Record track dimensions, spacing, direction and other observations.
- Ruler or measuring tape: Measure individual prints if practical.
- Compass or phone compass: Optional, for recording the direction of travel.
- Map or marked path: Useful for measuring 100 metres safely.
- Camera or phone: Take photographs of tracks before following them, including a scale beside a print.
- Suitable footwear and clothing: Muddy and snowy ground can be slippery, cold or uneven.
Do not bring food or bait to attract an animal. The challenge is about reading signs that wildlife has left naturally, not encouraging animals to approach.
Take the Challenge
1. Find a suitable tracking area
Look for ground where animals are likely to pass and where the surface preserves footprints. Mud beside a puddle, soft earth along a woodland edge or fresh snow on a quiet path can all provide useful evidence.
Good places to look include muddy sections of public footpaths, the edges of fields where access is permitted, woodland paths and the margins of ponds. Check that you have permission to enter the area and stay on permitted routes where required.
Walk slowly and scan the ground ahead rather than staring at one spot. Look for repeated depressions, paired prints, claw marks and trails crossing the path. A single indentation might be caused by a boot, a falling branch or a hoof; a sequence of similar marks is usually more informative.
Do not enter private land, sensitive habitats or restricted areas to pursue a trail. If it leads into dense vegetation, towards a road, onto unstable ground or into an area where access is not permitted, stop and choose another trail.
2. Examine the first clear print
Before following the trail, study a print that is well preserved. Take a photograph with a ruler or another suitable scale beside it, without pressing into or altering the impression.
Look at the following features:
Shape: Is it round, oval, elongated or divided into separate sections? A hoof often leaves a divided impression, while many mammals with paws leave a central pad and toe marks.
Size: Measure the approximate length and width. Size can help narrow down possibilities, but young animals and different species can leave similar-sized prints.
Toe marks and claws: Check whether individual toes are visible. Claw marks can sometimes help distinguish likely species, but they are not reliable on every surface.
Depth and definition: A deep print does not automatically mean a large animal. The animal’s weight, the softness of the ground and how the foot landed all affect the impression.
Pattern: Look at the surrounding prints. Are they arranged in pairs, a fairly straight line or a repeated sequence of four? The pattern can be more useful than a single footprint.
Avoid identifying an animal from one feature alone. Several clues should support your conclusion.
3. Work out which animal may have passed
Use the shape, dimensions and arrangement of the prints to develop a shortlist of possible animals.
For example, a fox may leave a relatively narrow, oval paw print with four toes, while a dog may leave a broader-looking print with a different overall shape. Deer tracks commonly show two pointed halves from a cloven hoof. Rabbits and hares often leave groups of prints that reflect their bounding movement, with the larger hind feet landing ahead of the smaller front feet.
These are useful starting points, not absolute rules. A dog print can resemble a fox print, and a hoof impression can be distorted by mud or melting snow. Birds may leave three forward-pointing toes, but the shape varies considerably by species.
Record your best identification and at least one alternative. For instance, you might write, “Most likely fox; a small dog is another possibility because the prints are narrow and the trail is fairly straight.”
If you have a reliable field guide, use it to compare several features rather than matching the first picture that looks similar. You can also photograph the prints for later comparison. Avoid handling droppings, carcasses or other potentially contaminated material.
4. Follow the trail carefully
Once you have found a sequence of prints, identify the direction of travel. Look for the next print in the pattern, then scan the ground ahead for the same sequence.
Move slowly enough to inspect the surface without stepping on the evidence. Keep to durable ground where possible, and avoid trampling vegetation or disturbing nearby animals.
Use the trail itself as your guide. Do not assume the animal continued in a straight line. It may have turned, paused, changed pace or moved around an obstacle. In snow, wind and melting can soften prints; in mud, water or later footsteps can obscure them.
If you lose the trail, stop at the last clear print. Scan a small area ahead and to either side, looking for the same track shape and spacing. Look for the route of least resistance, such as a gap in vegetation, but treat that as a clue rather than proof.
If you cannot recover the trail after a careful search, mark the point where it disappeared. You can restart from a clearer section or select another trail. Do not claim an uninterrupted 100-metre track if you have had to guess where the animal went.
5. Measure the 100 metres
You need to establish that you have followed the trail for approximately 100 metres, rather than simply walking 100 metres in the general direction.
A map or measuring tool can help if the trail follows a clear path. If you use a phone GPS, remember that accuracy may be limited under trees or near steep terrain.
Where the trail bends, follow its actual course and estimate the distance along the route rather than measuring a straight line between the beginning and end. You can use known path markers or a measured route to help judge distance, provided they do not lead you away from the tracks.
If you cannot establish the distance accurately, record it as an estimate. The aim is to practise careful tracking, not to pretend that uncertain measurements are exact.
6. Record three details along the trail
As you follow the prints, note at least three observations. These should be things you can actually see, not guesses about what the animal must have done.
For example:
- A change in spacing: Prints become farther apart, perhaps suggesting a change in pace.
- A change of direction: The trail curves or turns around an obstacle.
- A change in print quality: The impressions become shallower on firmer ground or less distinct as snow melts.
- A second set of tracks: Another animal may have crossed the trail.
- A change in the pattern: The arrangement of prints changes, although the reason may not be clear.
Ask yourself what each clue might mean and whether there is another possible explanation. Wider spacing can indicate faster movement, but differences in terrain can also affect how an animal places its feet.
Do not follow fresh tracks towards a wild animal to get a better look. If you suspect that an animal is close, give it space and end the challenge if necessary.
7. Make a final assessment
At the end of the 100 metres, review the evidence you collected. Does the trail still resemble the animal you identified at the beginning? Did the print shape or pattern change? Were there any signs that another animal might have crossed the route?
Write a short summary covering:
- The animal you believe made the tracks.
- The strongest evidence supporting your identification.
- Your three observations along the trail.
- Whether you followed the full 100 metres continuously.
- Your confidence in the result and what remains uncertain.
It is perfectly acceptable to finish with “probably a fox” or “a small deer is likely, but I cannot be certain”. Responsible tracking means recognising the limits of the evidence rather than forcing a definite answer.
Check Your Results
Before marking the challenge complete, check that you have met the practical requirements.
Track identification: Did you describe the print’s shape, size and pattern? Did you consider another possible animal?
Trail following: Did you follow a genuine sequence of tracks rather than isolated impressions? Were you able to follow the route for 100 metres?
Observation: Did you record at least three details and consider what they might mean?
Evidence: Do your photographs show the tracks clearly, ideally with a scale beside one print? Can you explain where the trail started and finished without revealing sensitive wildlife locations?
Responsible behaviour: Did you avoid baiting, approaching, chasing or disturbing wildlife? Did you respect access restrictions and leave the site as you found it?
If the identification is uncertain but your observations are sound, that is still valuable learning. Trackers improve by comparing evidence and being honest about uncertainty.
Complete the Challenge
Your challenge is complete when you have followed a genuine animal trail across mud or snow for 100 metres, recorded the features that helped you identify it, and documented at least three observations along the way.
If weather or ground conditions make a continuous trail impossible to follow, try again in a suitable location rather than filling the gaps with assumptions. Fresh snow and soft mud can be excellent for tracking, but neither guarantees clear prints.
Take a final photograph of a clear print or a section of the trail. Include a ruler for scale if possible, and make sure the evidence reflects what you actually observed. Do not disclose the exact location of a vulnerable or sensitive wildlife site in a public post.
The most important result is not necessarily naming the species correctly. It is learning to notice small details, follow a trail methodically and separate what you can see from what you think might have happened.
How to Submit Your Challenge
Once you have completed the 100-metre trail, share your evidence with the Survival Guides UK community.
Log in to your SGUK account and open your member profile. Find the Social Activity section and create a post containing your photograph and a short description of your tracking attempt.
Include the hashtag #SGUKChallenge94 in the post so your entry can be identified for verification.
Explain which animal you believe made the tracks, mention one or two features that helped you decide, and state whether you followed the trail for the full 100 metres. If your identification is uncertain, say so; careful reasoning is more useful than an unsupported claim.
Submit your evidence
Your post should include:
- A clear photograph of at least one track, ideally with a scale.
- The hashtag #SGUKChallenge94.
- Your proposed animal identification and the evidence behind it.
- A brief account of the 100-metre trail and three observations you made.
Once submitted, your evidence can be checked against the challenge requirements. Avoid posting precise locations where doing so could disturb wildlife or expose a sensitive habitat.
Challenge 94 Checklist
Use this checklist to make sure you have covered each part of the challenge.
Want to Push Yourself?
Once you can follow a clear trail, make the challenge harder by trying one of these variations.
Compare two species. Find two different sets of animal tracks and record the differences in shape, dimensions and spacing. Explain which features are most useful for distinguishing them.
Track across changing ground. Follow a trail as it moves from mud onto firmer earth, or from snow onto a bare path. Notice how the quality of the evidence changes and where the trail becomes harder to read.
Estimate movement. Look for changes in the spacing and arrangement of prints. Suggest where the animal may have slowed down, sped up or changed direction, while recording alternative explanations.
Return after fresh weather. Revisit a familiar permitted route after rain or snowfall and compare the tracks you find. Keep your observations general and avoid repeatedly visiting a location if your presence could disturb wildlife.
Improve your identification. Use a reputable British wildlife field guide to compare your photographs with likely species. Write down which clues support your conclusion and which do not fit.
Remember that a skilled tracker is not someone who claims to know everything from a footprint. It is someone who observes carefully, tests possibilities and knows when the evidence is inconclusive.
What’s Next?
Before moving on, consider revisiting SGUK Outdoor Skills Challenge 93: Cook an Egg in Its Shell in Embers if you have not completed it yet. It develops a different set of outdoor skills, focusing on managing a cooking fire and understanding the challenges of cooking safely outdoors.
You can also explore the other SGUK Outdoor Skills Challenges to keep building your practical knowledge, one skill at a time. Choose challenges that suit your experience, the conditions and the equipment available to you.
Once you’ve shared your evidence and it has been verified, the SGUK Outdoor Skills Challenge 94 is complete and the completed challenges figure will be updated on your profile.
🔒Ready to test your survival skills?
Join Survival Guides UK for free, complete challenges, earn badges and increase your Survival Level.
JOIN FREE →
CRAIG BURR
FOUNDER · SURVIVAL GUIDES UK
I'm Craig, the person behind Survival Guides UK. I created SGUK because I wanted somewhere people could learn real outdoor skills in a practical, straightforward way — from lighting a fire and tying knots to navigation, campcraft and everything in between.
You can read more about the story behind SGUK here as well as our approach here.