SGUK Outdoor Skills Challenge 90: Identify Five Constellations and Use Them to Find North
The night sky can provide useful clues about direction, but only when you know what you’re looking at. Long before modern navigation devices, travellers used familiar star patterns to orient themselves, estimate direction and recognise their place in the world.
For this challenge, you’ll learn to recognise five constellations and use the stars to locate north. You’ll need patience, a reasonably clear sky and an understanding of the difference between a helpful navigation clue and a precise bearing.
Your Challenge
Identify five constellations visible from your location and season, then use the night sky to find north.
You should be able to name each constellation, recognise its main pattern and explain how you identified it. At least one of your observations must involve using the Plough to locate Polaris, the Pole Star, which lies close to the north celestial pole.
The Plough is an asterism within Ursa Major rather than a separate official constellation, so for your five named constellations, count Ursa Major as one. The other four can be selected from patterns visible in your sky, such as Cassiopeia, Orion, Cygnus, Lyra or Auriga, depending on the time of year and visibility.
Complete this activity from a safe, stationary observation point such as your garden or a permitted open area. You do not need to walk through darkness to complete it.
What You’ll Need
- A clear view of the night sky
- Warm clothing appropriate to the weather
- A notebook and pencil
- A red-light torch or dim light for reading your notes
- A star chart or reputable astronomy app for checking your observations
- A compass, if available, for a comparison after you have estimated north
Choose a place away from bright streetlights if possible, while making sure it is safe and accessible. Give your eyes time to adjust to the darkness. Avoid looking at bright phone screens unnecessarily, as they can make faint stars harder to see.
A star chart or app is useful for learning, but make your own observation before checking it. The challenge is about developing recognition, not simply copying labels from a screen.
Take the Challenge
1. Choose a Suitable Night
Check the forecast for cloud cover and choose a night when you have a reasonable chance of seeing the stars. A clear, dark sky makes it easier to identify patterns, especially if you’re new to astronomy.
The visibility of constellations changes throughout the year and during the night. Orion, for example, is prominent in UK winter skies, while other patterns are better placed in different seasons. You may need more than one evening to identify five.
Find a safe place with an unobstructed view. Do not trespass or stand in a road, on a cliff edge or near water to improve your view. If clouds cover the sky, postpone the challenge rather than guessing.
2. Allow Your Eyes to Adjust
Once you are in position, give your eyes around 15–20 minutes to adapt to the darkness. You may begin to notice stars that were difficult to see when you first arrived.
Avoid using a bright white torch or staring at a bright phone screen. If you need to read your notes, use a dim red light where practical.
Look at the sky broadly rather than staring at one small area. Constellations are patterns formed by stars that appear close together from our viewpoint, and recognising their overall shape is often easier than trying to memorise every individual star.
3. Find the Plough
In the UK, one of the most useful star patterns for finding north is the Plough, also known as the Big Dipper in North America. It forms part of the constellation Ursa Major.
The pattern resembles a saucepan or ladle, with four stars forming the bowl and three making the handle. Its position changes throughout the night and year, so it may appear upright, tilted or nearly upside down.
Look for the four-star bowl first, then trace the three stars of the handle. If you cannot find it, use a star chart to learn its position for your location and time.
Record Ursa Major as your first constellation once you can recognise the pattern in the sky.
4. Use the Plough to Find Polaris
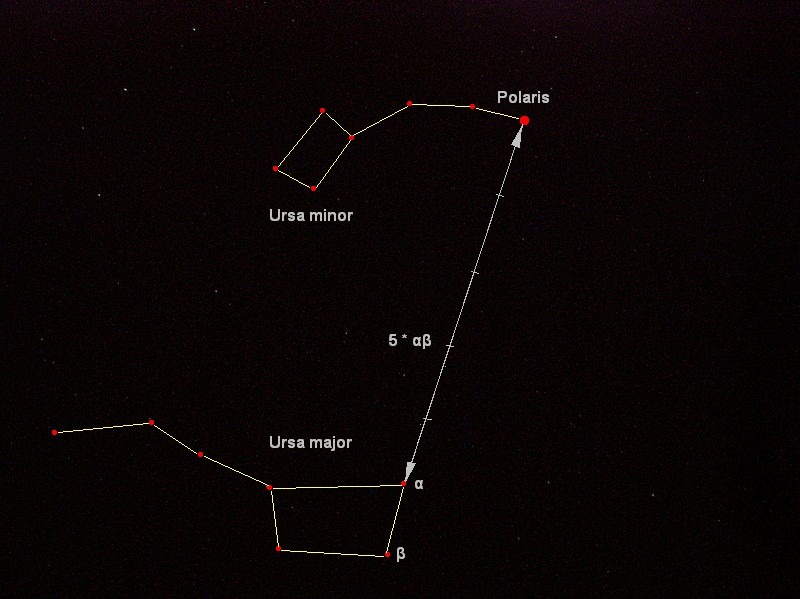
The two stars at the outer edge of the Plough’s bowl are often called the pointer stars. Imagine a line extending from the lower pointer through the upper pointer and continue it roughly five times the distance between them.
This line leads towards Polaris, the Pole Star, which is part of Ursa Minor. Polaris is not the brightest star in the sky, so look for it carefully rather than assuming the brightest star must be north.
Polaris lies close to the north celestial pole. In the UK, it appears above the northern horizon at an altitude roughly corresponding to your latitude. This makes it a useful indicator of true north: the direction from you towards the horizon directly beneath Polaris is approximately north.
Remember that Polaris does not mark north with perfect precision, and the accuracy of your estimate depends on how carefully you identify it and judge its position. It is a useful traditional navigation method, but not a substitute for a compass and map when accurate navigation is essential.
5. Identify Four More Constellations
Find four additional constellations that are visible from your location. The best choices depend on the season, time and light pollution.
Here are some patterns you may be able to use:
Cassiopeia: Often resembles a W or a stretched-out M. Its five prominent stars can make it easier to recognise than a more scattered pattern. It lies on the opposite side of Polaris from the Plough in the sky, although its orientation changes.
Orion: Particularly noticeable in UK winter skies. Look for three bright stars in a short, straight line forming Orion’s Belt, with brighter stars marking the shoulders and feet. The constellation is much easier to recognise when it is well above the horizon.
Cygnus: Often called the Northern Cross because of its cross-like shape. It is a summer constellation in the UK and includes Deneb, one of the bright stars forming the Summer Triangle.
Lyra: A relatively small constellation recognised by Vega, a very bright star. The remaining stars form a small parallelogram near Vega.
Auriga: A prominent winter constellation containing Capella, one of the brightest stars visible in the night sky.
You may choose other constellations instead. What matters is that you can identify five genuine constellations, not merely name five bright stars.
For each one, record its name, the pattern you recognised and one star or feature that helped you find it. If you’re unsure, check a star chart and revisit the observation when conditions allow.
6. Estimate North Before Checking Your Compass
Once you have located Polaris, stand still and estimate the direction of north from its position. If you have a compass, use it afterwards to compare your estimate.
Keep the compass away from phones, metal objects and other potential sources of magnetic interference. Remember that a compass indicates magnetic north, whereas Polaris gives an approximation of true north. The difference between the two is called magnetic declination and varies by location.
Your aim is to understand the relationship between the star and direction, not to produce a perfect bearing. If your estimate differs slightly from the compass, consider the limitations of each method and whether you identified Polaris correctly.
Never rely solely on star navigation to cross hazardous terrain, especially in darkness or poor weather.
7. Record Your Observations
Write down the five constellations you identified, the clues that helped you recognise them and how you used the Plough to locate Polaris.
Include the date, approximate time and general observing conditions. This will help you understand why certain constellations were visible and make it easier to repeat the activity in another season.
If you couldn’t find five constellations in one session, continue on another clear night. Learning the night sky takes practice, and a careful observation is more valuable than a list of names guessed from an app.
Check Your Results
Ask yourself the following questions:
Can you recognise five constellations? You should be able to describe the main shape of each one and identify at least one feature that distinguishes it.
Can you locate the Plough? You should be able to identify its bowl and handle rather than relying solely on a chart.
Can you explain how the pointer stars work? You should know that extending a line through the two stars at the outer edge of the bowl leads towards Polaris.
Can you explain why Polaris helps you find north? It lies close to the north celestial pole, making its direction a useful approximation of true north for observers in the Northern Hemisphere.
Did you check your estimate sensibly? If you used a compass, you should understand that magnetic north and true north are not exactly the same.
If you struggled, revisit the sky on another night and concentrate on one or two patterns at a time. Recognition becomes easier with repeated observation.
Complete the Challenge
You’ve completed this challenge when you can identify five constellations visible from your location and demonstrate how the Plough’s pointer stars lead towards Polaris.
You should be able to explain how Polaris helps you estimate north and understand why this method has limitations. Your evidence can include a photograph of your notes or a labelled sketch of the patterns you identified.
You do not need to take a photograph of every constellation. Many phone cameras struggle to capture faint stars, and the challenge is about your knowledge and observations rather than photographic quality.
How to Submit Your Challenge
Share your evidence on your Survival Guides UK member profile for verification.
Submit your evidence
- Log in to your Survival Guides UK account.
- Open your member profile and select Social Activity.
- Upload a photograph of your notes, a labelled sketch or another clear record of your observations.
- Include the names of your five constellations and add #SGUKChallenge90.
- Share the post for verification.
Your evidence should show that you have recorded your observations and understand how the Plough can help you locate Polaris. You do not need to go out into unsafe conditions to get a photograph of the stars.
Challenge 90 Checklist
Want to Push Yourself?
Learn the seasonal sky. Repeat the activity at different times of year and record which constellations are easiest to find. You’ll gradually build a mental map of the night sky.
Practise without an app. Once you know the main patterns, try identifying them from memory before checking a chart. This helps you develop genuine recognition rather than depending on a device.
Learn the Summer Triangle. Practise identifying Vega in Lyra, Deneb in Cygnus and Altair in Aquila. These bright stars form a large triangle that is particularly useful in UK summer skies, although it is not itself a constellation.
Combine astronomy with navigation knowledge. Learn how a compass bearing, a map and the stars provide different kinds of directional information. Understand when each method is appropriate and what can affect its reliability.
Keep a sky notebook. Record what you can see, the time, cloud cover and any light pollution. Over time, you will start to recognise how the sky appears to change through the night and across the seasons.
What’s Next?
Continue building your night-time outdoor confidence with SGUK Outdoor Skills Challenge 89: Set Up Camp by Headtorch in Under 20 Minutes. That challenge helps you practise organising equipment, pitching a shelter and preparing a sleeping area when daylight is no longer available.
You can complete SGUK Outdoor Skills Challenges in any order, so choose the next activity that interests you and keep building your skills through practice.
Once you’ve shared your evidence and it has been verified, the SGUK Outdoor Skills Challenge 90 is complete and the completed challenges figure will be updated on your profile.
🔒Ready to test your survival skills?
Join Survival Guides UK for free, complete challenges, earn badges and increase your Survival Level.
JOIN FREE →
CRAIG BURR
FOUNDER · SURVIVAL GUIDES UK
I'm Craig, the person behind Survival Guides UK. I created SGUK because I wanted somewhere people could learn real outdoor skills in a practical, straightforward way — from lighting a fire and tying knots to navigation, campcraft and everything in between.
You can read more about the story behind SGUK here as well as our approach here.